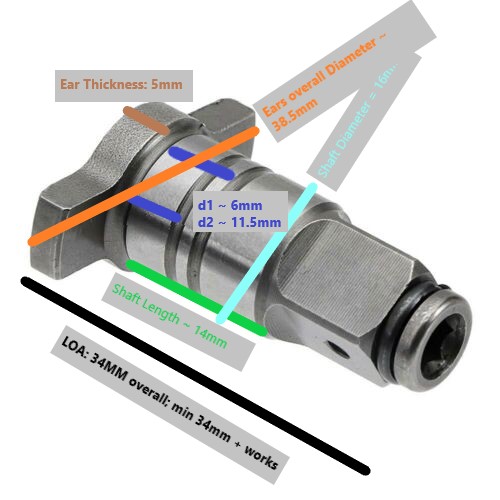
Hello all, trying to modify an existing Impact driver to make it a square impact wrench. Any ideas on sourcing an anvil by dimmensions/requirements? Have been searching a lot but most everything is a generic part for an impact wrench and alot of times no dimmensions are provided which proves difficult to determine fitment. Tried looking on alibaba but very hard to nail refine the search for appropriate results. I’m attaching a photo of the ideal anvil I need, but the most important factors would be 1/4" square drive and 16MM bearing shaft, the rest I can probably modify to make it work if need be. Thanks for any ideas in advance. - Paul
In my opinion this is the very definition of “needle in a haystack”. As you have already found out, it’s very rare to find published dimensions for parts like these, and even if those dimensions were published it’s still a matter of luck to find one that matches your requirements.
I have two ideas. First is to study the product line of the manufacturer whose impact driver you are using. They might happen to make an impact wrench whose parts are interchangeable because they’re using the same hammer assembly in both tools. Second idea is just to make the part you need by welding or brazing the appropriate adapter into your existing anvil.
It probably is, but figured I’d see if anyone had any experience swapping anvil’s and a good source for specs or diagrams on anvils across manufacturers.
I have three impacts and two drivers open on my bench working at finding a solution with parts made by bigger manufacturers (dewalt/milwaukee mostly), my problem being the 1/4" square drive is seldom used in comparison to the hex drive. the base impact is a Dewalt impact driver and I don’t believe they make a 1/4" drive impact wrench which I would have hoped to be a plug and play part. I do see that Mac Tools has a 1/4" drive impact, which I believe would be made by Dewalt, but I am doubting I will be able to find dimensions prior to ordering so it might be a blind order and hope it works. Most results are Milwaukee specific which may work with modifications. If nobody has any ideas on a reference for anvil specs I will probably just get one that is oversized and turn it down or bore where necessary.
Thanks for the reply
people have done this with dewalt ones - where the 3/8 impact wrench was speced around the same as the impact driver. (not that nnew compact thing)
Thus the anvils were identical in the bearing cap. so you could find the anvil from a service catalog and take apart the driver and replace.
There is surely a you tube on this. Key here - similar speced thing. If your maker of device has a 3/8 impact wrench that is close to your impact driver then I suspect the part exists.
if oyu want less than a 3/8 drive anvil then that’s going to be an issue.
I mostly use an adapter when I want to run sockets so far no issues.
1 Like
No youtube as it’s the brand new 850B, have reached out to McMaster / Grainger for some assistance, as far as a catalog I am not sure who makes one for this sort of thing as online results are slim to none outside of the same couple Milwaukee or Makita anvils. Have asked for dimensions from manufacturers with them having no clue or unwillingly to provide a diagram. The whole point of this is to not need an adaptor and dedicate the drill to 1/4" impact sockets for the most part along with it being the smallest offered impact on the market would fit easiest into tighter spaces. Since Dewalt is behind MAC Tools I decided to order the mechanism and anvil for the MCF901 which guarantees a match on the backside of the anvil but hopefully does not cause any issues with motor attachments. With any luck the bearing surface will be 16mm, but if not a bushing will have to suffice for the time being until I come up with a better solution.
So what’s the problem with brazing a short adapter in the anvil of your 850? That’s probably a half-hour job and most of that is waiting for the parts to cool. You could have the finished tool in your hand this afternoon if you cared to. That seems a lot more efficient than than spending a lot more chasing after data you are unlikely to find in the end.
as compact as that is. and as strong as that is.
unless it uses the same anvil inside as the 895 or the 887 and I doubt it. I’d just get one of those quality hex to square impact rated adapters and call it a day.
why - it’s so short you need some gap between your end and whatever your bolting on and it’s the easy peasy way use the device.
I have an 895 and an 888 that I won. not sure which I like best actually but I think I like the 895 more - anyway I’ve thought of trading out the anvil as per the video on the 888 and I just can’t justify the cost and time of it - vs I have an irwin impact rated adapter.
Adapters work for me, I have long and short ones depending of if clearance or visibility is more important. I also really like the Milwaukee no. 2467 90-degree impact driver for tight spots, that will get into places that even the DCF850 won’t fit into. It’s not as powerful as the 850 but I’ve never felt it lacking for 1/4-drive work, it will do 50 ft-lb.
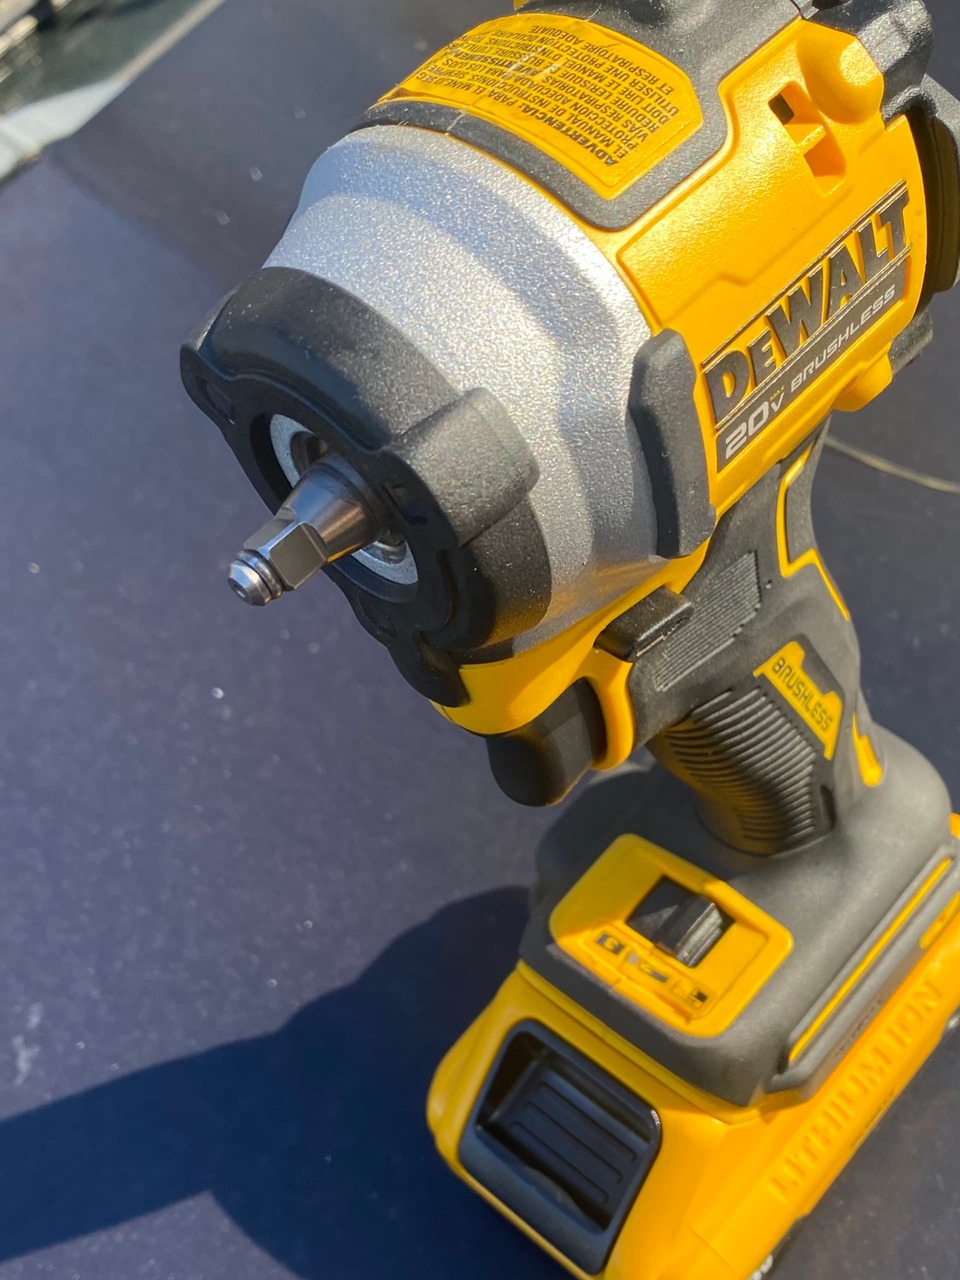
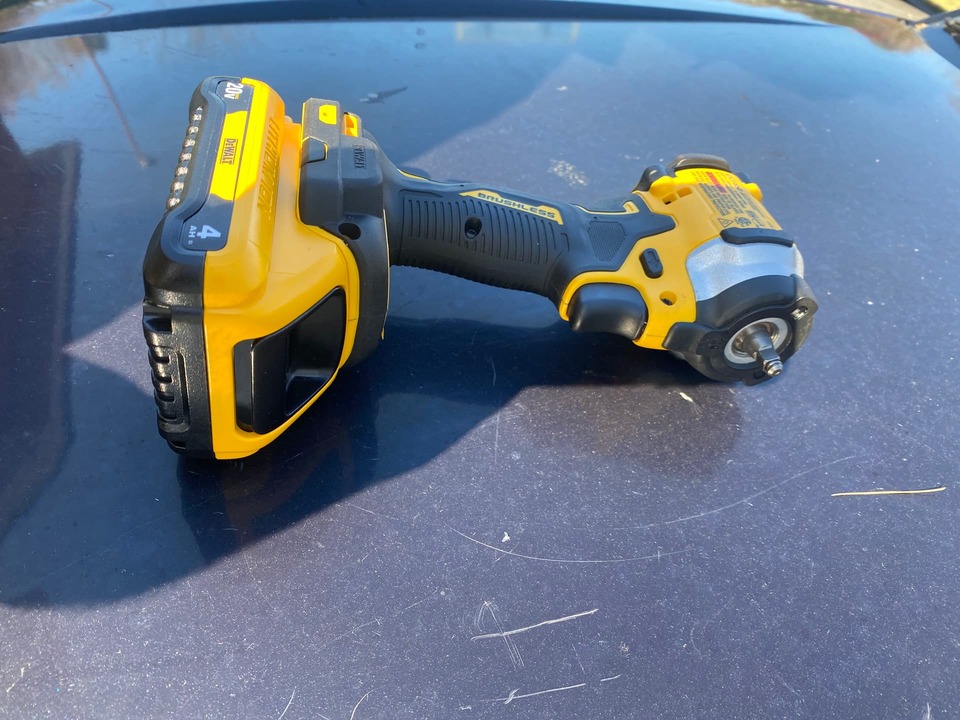
All, here it is, I wanted a clean square anvil to decrease LOA as much as I could for tight areas instead of adding the length of an adapter even though they are “relatively” not that long but probably would add 1/2” I’m guessing to keep the hex with an adapter. in the end project was just for fun and I wanted it to have a clean look so using a COTS anvil is also more aesthetically pleasing. I believe the shortest one on the market from a reputable brand is the MATCO Stubby for a 1/4 (or any size square), which is 4 7/8” (if I remember correctly) with 65ft-lbs of working torque. This mod, the square Anvil swap, puts the 850B almost right at 4 inches maybe a touch under l, I’ll check with my calipers later. I’ll run some torque tests, but given the same gear mechanism the torque output would theoretically only change because of different diameter & thickness of the ears. They are slightly different so I’ll have to try it out.
1 Like

This has been an interesting project and thread to follow. Well done and congrats on getting what you wanted!
so like the other video for the 885, 895 - you took the anvil out of the MAC and put it in the housing of the 850?
glad it worked. that’s a 3/8 hog ring right?
Thanks Mike, appreciate it, hope someone else can use the thread to accomplish it with less research hassle.
Probably, I’m not sure which video being referenced, but for the most part any hex to square conversion would mean taking out the existing anvil and replacing it with the new desired anvil, but in this case here you have to address the output bearing to output anvil diameter delta as well as address backspacing. I think it cost me ~25-$30 to do it, but half of that is in shipping cost if not more. I’ve talked to people elsewhere who have seen the swap and they gave references to different parts I used that may be useful if I were to do it again, I’ll outline below for anyone that wants to do this.
For anyone in the future trying to accomplish this that does not want to use the aforementioned compromises, here is what I have learned / found out at this point:
MAC TOOLS MCF901 Anvil is compatible with the Gear/Hammer assembly output in terms of the output shaft of the hammer working with the receptacle/female “bearing” on the anvil itself.
In terms of your anvil and housing output mating, I was told elsewhere that if you order the MCF901 Housing “Cone” and take the bearing from that and pop it into the DeWalt it should work, which makes sense. What I am not sure of is if if the outer diameter of the bearing lines up with the updated DeWalt Output Cone Surface diameter to accept that bearing or if you would have to modify it. If doing it again, I’d probably go this route if the cone portion of the MCF901 is not too expensive and try to use the bearing from that as it would have more precise contact than what I actually did.
The way I ended up doing it was I order an oil embezzled sleeve bearing for a 7/16" shaft with a 5/8" outer diameter and first bored the inner diameter to where I could press it onto the anvil (I can’t remember exact sizes off the top of my head). Once it was pressed on, I then rotated it in a drill and sanded the outter diameter slightly so it would fit into the existing 850 output bearing. At this point your anvil is good to go, but you will have an output backspacing issue of about .020" if I remember correctly, therefore you can either replace the plastic washer in the cone with a washer of that size to compensate, or add a second.020" diameter washer, but I would make sure the OEM washer is used against the anvil/hammer side and the one you insert be set against the cone if you go this route. Make sure you grease before final installation so that it lasts & good luck!
Thanks for following.
Where did you buy the 1/4 square anvil? I’ve searched online, it shows out of stock anywhere I found it.